How to Export from Mega Voxels to Unity
Mega Voxels and Unity work perfectly together for creating video games that use the voxel style. In this tutorial, we will show you how to export your voxel models from Mega Voxels and import them into the Unity Game Engine.
To access the export options inside of of Mega Voxels, tap on the File menu (hamburger icon) at the top left of the editor.
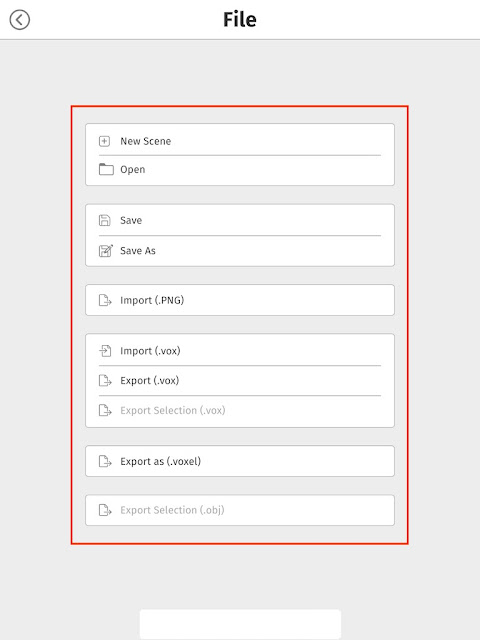
When you open the the File Menu for the first time you will see several options to choose from for. We will discuss what each of these option mean for you.
These are the Export formats supported by Mega Voxels:
And that's it! You should now be able to access your voxel art model inside of your Unity project! Next we are going to show you how to drag it into your scene.
After you drag it in, you should see your voxel model that you created inside of Mega Voxels. As you probably noticed, Unity automatically detected what material to apply to your model and also what texture to use because it was in the same folder with your model.
And there you have it! Now you know how to successfully import a voxel model into Unity from Mega Voxels. If you have any question or comments please leave them below. Thanks for reading.
So after you have created your voxel model inside of Mega Voxels, you are now ready to import it into Unity so you can make your video game. Now you might be asking, how do I export from Mega Voxels to Unity? Fortunately, Mega Voxels supports many different export options. Specifically it supports the .OBJ file type which is a model file supported by the Unity Game Engine for making games. We'll be covering the steps to import your voxel art models into your Unity project. To begin we will show you how to export your voxel model out of Mega Voxels.
Getting Started
Mega Voxels has become a great option for game developers because of how it easy it is to make 3D models, but what makes it even better is its variety of export options. Combine this with the Unity game engine and anyone can make their first video game easily. There are two primary steps that we will cover to get your voxel models into Unity. First we will export the voxel model out of Mega Voxels. Then we will import the voxel model into Unity. We will cover these steps in more detail in the next section.This tutorial supports Mega Voxels 1.7 or newer. If you need help installing Mega Voxels, view our previous tutorial How to Install Mega Voxels. There you can find a step by step tutorial on getting Mega Voxels running on your phone or tablet.
This tutorial supports Unity 2020 or newer. If you need help installing Unity, view our quick tutorial How to Install Unity. There you can find a step by step tutorial on getting the Unity Game Engine running on your computer.
How to Export from Mega Voxels
Now before we can export a voxel model out of Mega Voxels and import it inside of the Unity Game Engine, we must first learn what types of files Unity supports. Unity supports a diverse set of 3D model types including .FBX, .DAE and .OBJ. Now Mega Voxels has the ability to export quite nicely using the .OBJ file format. So to begin we will export our voxel using .OBJ. For this tutorial we used a simple castle model that you can access inside of the Shop, however this process is universal so feel free to use any voxel model that you like.To access the export options inside of of Mega Voxels, tap on the File menu (hamburger icon) at the top left of the editor.
When you open the the File Menu for the first time you will see several options to choose from for. We will discuss what each of these option mean for you.
Sponsored Ad
These are the Export formats supported by Mega Voxels:
- New Scene - Creates a brand new scene inside of Mega Voxels
- Open - Opens a previously created scene
- Save - Saves the current scene into your gallery
- Save As - Allows you to save your scene with a new name into your gallery
- Import (.PNG) - Imports a PNG image into the editor as voxels
- Import (.VOX) - Imports a MagicaVoxel VOX file into the current scene
- Export (.VOX) - Exports all models in the scene as individual MagicaVoxel VOX files
- Export Selection (.VOX) - Exports the currently selected model in the scene as a MagicaVoxel VOX file
- Export as (.VOXEL) - Exports the current scene as a Mega Voxels VOXEL file
- Export Selection (.OBJ) - Exports the currently selected model in the scene as an Wavefront OBJ file
For this tutorial we will select the last option, Export Selection (.OBJ). Before you hit that button make sure you have the model selected in the scene, if not the button will be disabled.
Now that you have it ensured you have the model selected go back to the File menu and tap on the Export Selection (.OBJ).
Now depending on what operating system you are using you will see a different popup, but overall the options are the same. For Android OS, on you should see something like this.
The main purpose here is to export the files from the editor onto your computer. As you can see, any app or service installed on your device is available including Gmail and Google Drive. You can use whatever options works best with your workflow. In our example we had the app installed on an iPad so we were able to use the AirDrop tool which allows us to send files from our iPad to our MacBook Pro.
Sponsored Ad
Import Your Voxel Art into Unity
Now that you have your exported your model to your computer, you are ready to import your model into Unity. If you notice when you exported your model it was actually exported as a .ZIP file. The reason for this, is that all OBJ models that are created properly have a 3 files: an OBJ file, a MAT file and a PNG file. Once this .ZIP file is on your computer go ahead and uncompress it. This important because Unity does not accept .ZIP files.
Note: If you haven't already create a new project in Unity, or open an existing project in Unity.
Once you have your project open in Unity, and you unzipped your folder from Mega Voxels, simply drag your folder into your Unity project. Its important to note that you must drag it inside of the Assets folder if not you won't be able to use it in your scene. In the image below we dragged our newly created model into the Assets folder.
And that's it! You should now be able to access your voxel art model inside of your Unity project! Next we are going to show you how to drag it into your scene.
How to Load A Voxel Model into a Unity Scene
It's actually very easy to import your model into a Unity scene. Simply click and drag the .OBJ file that was inside of the folder into your Unity Scene. This is the file with the cube icon next to it.
Sponsored Ad
Great! Our model is now inside of a Unity scene and can be used to make a game. However there is one more issue to address. If you look closely at the model you will notice that the texture on the model is fuzzy and not crisp the way it appears in the app.
This is caused by compression settings that are automatically applied to textures when you import them into Unity for performance purposes. We don't need this settings though, so we will disable this. To change this select the texture, PNG file, in the project window and locate the Filter Mode property. Set this to Point (no filter). Click Apply
Now our model looks crisp just like it did in the editor. Here is our finished work.
And there you have it! Now you know how to successfully import a voxel model into Unity from Mega Voxels. If you have any question or comments please leave them below. Thanks for reading.


Comments
Post a Comment